Saturday, March 31, 2012

Best Brownies


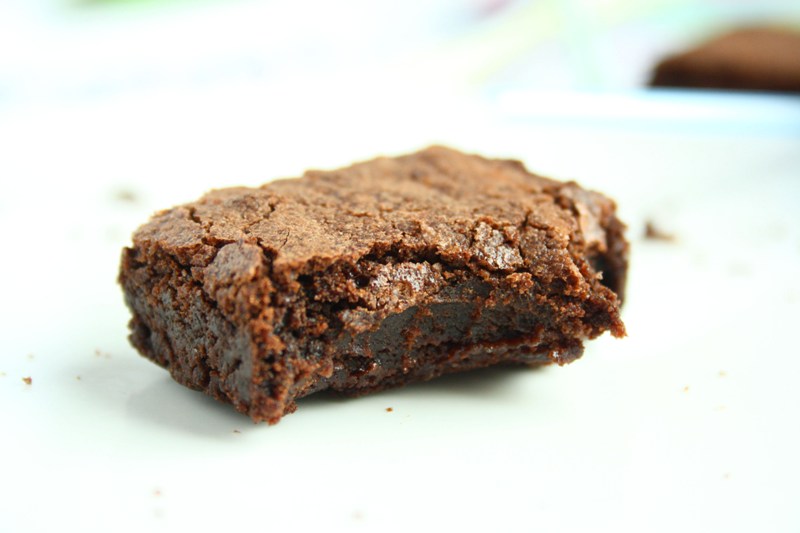
I can imagine how often you see bloggers claiming to have the "best" brownie recipe. Well, I guess I'm one of them. But how could I call them just brownies if I ate half of the batch at once? No, I'm not joking. I ate half of the brownies and was being tempted by the remaining ones. Thank God I resisted. Anyway, I ate way too much of them. What a shame. But sometimes I just can't help myself. They're just too good.

Too good. 

And so chewy.

But seriously. I've tried lots of brownie recipes and none of them was so good. I've been making these for years and they never disappoint me. They should contain nuts so feel free to add some but I don't like nuts in my chewy brownies.


Best Brownies
Print Options
140g(1 1/4 sticks) unsalted butter  
275g (1 1/4 cups) sugar 
80g (3/4 cup + 2 tbsp) unsweetened cocoa powde
1/4 tsp salt 
1 tsp vanilla extract
2 large eggs
70g (1/2 cup) all-purpose flour
2/3 cup pecan pieces (I ommited this)

1 Preheat oven to 160C.
2 Combine the butter, cocoa, sugar, and salt in a medium heatproof bowl. Set the bowl in a wide skillet of barely simmering water. Stir the butter cocoa mixture from time to time until the butter is melted and the mixture is smooth and hot enough that you want to remove your finger quickly after dipping it in to test. Remove the bowl from the skillet and set aside briefly until the mixture is only warm, not hot.
3 Stir in the vanilla extract. Add the eggs one at a time, stirring quickly after each one. When the batter looks shiny, thick, and well mixed, add the flour and stir until you cannot see it any longer. Spread the batter evenly in the pan.
4 Bake until a tester inserted into the center comes out just slightly moist with batter, 20 to 25 minutes. Let the brownies cool completely on a rack. Cut in slices. (just don't overbake if you want them moist and chewy!)

Wednesday, March 21, 2012

Peanut Butter Bars


Makes 40 small bars. 

Peanut Butter Bars
  • 1 cup (2 sticks) butter
  • 1 cup peanut butter
  • 2 cups graham cracker crumbs
  • 2 cups powdered sugar
Frosting
  • 1 1/2 cups chocolate chips
  • 1/3 cup peanut butter
In a large bowl (over low heat or in a micro-wave), melt together butter and peanut butter. Add graham cracker crumbs and powdered sugar. Mix until well blended. Press into an un-greased 23x23cm (9″x 9″) pan (you can line it with parchment paper which helps to take them off after you refrigerate them.)

To make the frosting, melt together chocolate chips and peanut butter stirring frequently until smooth. Spread over bars. Refrigerate for 1 hour and cut into slices.


Sunday, March 18, 2012

Browned Butter Cinnamon Teacake


I'm so happy I've discovered browned butter. I fall in love with desserts which make the house smell like heaven. This cake is one of them. It smells so wonderfully when it is in the oven but what I like most is browned butter. Oohh the browning process is incredible. All the house smelled like caramel. So the final result was as good as I expected. How can something with BROWNED butter be bad? The cinnamon flavor isn't too intense, it's just right. And about the frosting, I never thought this could be so good. I'll be definitely try it for cupcakes.


Browned Butter Cinnamon Teacake

150g (5 1/2 oz) butter
185g (6 1/2 oz) self-raising flour
30g (1 oz) cornstarch or cornflour
1 tsp ground cinnamon
185g (6 1/2 oz) caster sugar
3 eggs, lightly beaten
1 tsp vanilla
60ml (2 oz) orange juice
60ml (2 oz) milk
extra ground cinnamon, optional, to decorate
Browned cinnamon icing:
80g (2 3/4 oz) butter
80g icing sugar
1/2 tsp ground cinnamon

1) Preheat the oven to 180 C. Lightly grease a 20cm square cake tin and line with baking paper. In a small saucepan, stir the butter until melted. Continue to heat it until it gets golden brown. Remove from heat and cool.

2) Sift the flours and cinnamon in a bowl. Add the sugar. Place eggs, vanilla, juice, milk and browned butter in a separate bowl and stir well. Pour the wet ingredients into the dry. Beat the mixture on low spead until moistened. Beat on high speed for 5 minutes until it's free of lumps.

3) Pour the mixture into the prepared tin and bake for 40 minutes or until the skewer comes out clean when inserted into the centre (I only needed 30 minutes so don't overbake it). Remove from oven and let cool completely.

4) To make the icing, brown 30g of butter as in step 1. Cool. Beat the remaining butter and icing sugar until creamy. Add the cinnamon and browned butter, beating until fluffy. Spread over the cake and sprinkle with cinnamon.

Storage: the cake can be stored for up to 4 days in an airtight container of frozen for up to 3 months without icing.

Friday, March 16, 2012

Flourless Chocolate Cake


Sorry I haven't updated my blog for such a long time! The thing is that I'm soo busy with baking recently. And of course - there's so much work and study that I just don't have a spare minute. But! This weekend is going to be a baking weekend from morning till night so I promise to post all my experiments.

By the way, this cake is wonderful. Moist, decadent, rich and so on. And not difficult at all. I prefer it cold because when it is taken out of the fridge it's firmer. You decide! Here's the recipe:

Flourless Chocolate Cake

½ cup (65 g) unsweetened cocoa powder
½ cup (120 ml) boiling water
1 tsp vanilla
16 Tbs (225 g) unsalted butter, softened to room temperature
1 cup + 2 Tbs (230 g) sugar, separated
6 large eggs, separated, keeping the whites clean with no trace of yolk or shell
1/8 tsp salt
Scant 1 2/3 cups (170 g) finely ground almonds
½ tsp ground cinnamon

1) Preheat the oven to 350°F (180°C). Line an ungreased 9-inch (23 cm) baking pan or springform pan with parchment paper.

2) In a small, heatproof bowl, stir the boiling liquid into the cocoa powder and stir until the cocoa is dissolved and the mixture perfectly smooth. Stir in the vanilla and set aside to cool.

3) In a large mixing bowl, beat the softened butter with 1 cup of sugar on low speed until all of the sugar is incorporated into the butter then increase speed to medium and beat for about 2 minutes until light and fluffy. Beat in the egg yolks two at a time, beating after each addition just until incorporated, scraping down the sides as necessary. Beat in the cocoa mixture followed by the almonds and ground cinnamon until well blended and the batter is smooth and creamy.

4) Place the whites in a very clean bowl, preferably plastic or metal if possible, with the salt. Using very clean beaters, beat on low speed for 30 seconds, then increase beater speed to high and continue whipping the whites until opaque and soft peaks form. Gradually add the remaining 2 tablespoons of the sugar while continuing to beat until stiff peak form.

5) Using a spatula, fold in about a quarter of the stiff egg whites to lighten the batter, then fold in the remaining whites, a third at a time, until completely incorporated with no white lumps. The batter should be light and smooth. Scrape into the prepared pan, smooth the top and bake for 60 to 65 minutes. After the first 30 minutes you will want to cover the top of the cake loosely with a square of aluminum foil to avoid overbrowning. The cake is done when the center is just set. Do not overbake.

6) Remove the cake from the oven and allow to cool in the pan for about 45 minutes. Run a sharp knife blade around the edge to loosen from the sides of the pan before turning the cake out onto a cooling rack or directly onto a serving platter.

Note: I recommend you to refrigerate it overnight before serving because then next day it was much more delicious! I imagine it would be perfect served with vanilla ice cream and raspberry jam.. mmm.. 


Sunday, March 11, 2012

Chocolate Macarons


Yes, yes, yes.. I know that these aren't the most perfect macarons. However, everybody has heard how difficult it can be to bake them. (Except for those lucky people who bake them perfect on their first attempt. I'm not one of them.) Anyway, I'm going to try again and again until I learn how to bake them. I know what I did wrong this time - the oven was too hot. I preheated mine as it was written in the directions but every oven is different - be careful with that. And of course, I baked them too long. So I know what mistakes I did and hope that next time they will turn out much better. Don't think they were bad! Oh no, they were good enough as you can see in the photos. The taste was fine but not all of them rised well. That's it! I encourage you to try making them and don't be disappointed if they don't turn out perfectly on your first attempt - the next one can be successful. It's all about practice. 

Adapted from David Lebovitz

Macaron Batter
1 cup (100 gr) powdered sugar
½ cup powdered almonds (50 gr, sliced almonds, pulverized)
3 tablespoons (25 gr) unsweetened Dutch-process cocoa powder
2 large egg whites, at room temperature
5 tablespoons (65 gr) granulated sugar

Chocolate Filling

½ cup (125 ml) heavy cream
2 teaspoons light corn syrup
4 ounces (120 gr) bittersweet or semisweet chocolate, finely chopped
1 tablespoon (15 gr) butter, cut into small pieces

Preheat oven to 180º C.
Line two baking sheets with parchment paper and have a pastry bag with a plain tip (about 1/2-inch, 2 cm) ready.
Grind together the powdered sugar with the almond powder and cocoa so there are no lumps; use a blender or food processor since almond meal that you buy isn’t quite fine enough.
In the bowl of a standing electric mixer, beat the egg whites until they begin to rise and hold their shape. While whipping, beat in the granulated sugar until very stiff and firm, about 2 minutes.
Carefully fold the dry ingredients, in two batches, into the beaten egg whites with a flexible rubber spatula. When the mixture is just smooth and there are no streaks of egg white, stop folding and scrape the batter into the pastry bag (standing the bag in a tall glass helps if you’re alone).
Pipe the batter on the parchment-lined baking sheets in 1-inch (3 cm) circles (about 1 tablespoon each of batter), evenly spaced one-inch (3 cm) apart.
Rap the baking sheet a few times firmly on the counter top to flatten the macarons.
Let the macaron rest for at least 2 hrs, then bake them for 15-18 minutes. Let cool completely then remove from baking sheet.

To make the chocolate filling:
Heat the cream in a small saucepan with the corn syrup. When the cream just begins to boil at the edges, remove from heat and add the chopped chocolate. Let sit one minute, then stir until smooth. Stir in the pieces of butter. Let cool completely before using.

Assembly:
Spread a bit of batter on the inside of the macarons then sandwich them together


Friday, March 09, 2012

Almond Cookies


These cookies are very delicious perfect for a snack with a cup of tea. Actually these are made of a leftover tart dough. That's why I was surprised how they turned out. These aren't the chewy gooey cookies but flaky and crispy ones. You won't be disappointed!


Almond Cookies


1/4 cup whole toasted almonds
1/4 cup sugar
1 1/4 cups plus 2 tablespoons all-purpose flour
1/4 teaspoon salt
1/2 cup unsalted butter, cold and cut into cubes
1 large egg, lightly whisked

1) Put the almonds and sugar in the bowl of a food processor. Pulse until the almonds are finely ground. Add the flour and salt and pulse until just combined. 

2) Add the butter and pulse until sandy, about 6 to 10 quick pulses. Add the egg and pulse until the dough comes together into a ball. 

3) Form the dough into a disk, wrap in plastic, and refrigerate for at least an hour, or overnight. Take out of refrigerator and form little balls. Press to flatten. Put on a baking sheet and bake in a preheated oven (180deg C) until golden brown.

Enjoy!


Monday, March 05, 2012

Chocolate Truffles


Last week my friend asked me to make a gluten free dessert  for her mother's birthday. I was browsing my recipes and could not decide what to make. And then I remembered the chocolate truffles which I had made a year ago. Problem solved! I knew everybody would like these truffles. Although I was a little bit nervous about making them (I always feel worried when I make desserts for others). But finally they turned out wonderful. The next day my friend told me that her mother liked the truffles very much. Isn't it the most heartwarming compliment for a baker?

Here's the recipe

Chocolate truffles

 225g good quality dark chocolate
150ml heavy cream
1 tbsp cognac*
100g icing sugar
1 tbsp strong coffee, cold
cocoa powder, for covering the truffles

almonds**
cognac, rum or coffee liqueur***
dried plums or cherries***

*You can use any alhohol you like or leave this out. I used coffee liqueur.
**Original recipe didn't call for any nuts but I wanted to experiment. I took half of the truffle mixture and mixed it with coarsely ground nuts and left some for coating the truffles. You can use any nuts you like.
***First I didn't think dried fruit in the centre will taste good but after I tasted the truffle I was completely satisfied. The truffle is slightly bitter and the sweet fruit in the middle makes it perfect. I used dried plums but I think dried cherries would taste wonderful. You can use any fruit of your choice but it is important to choose soft and rich fruit. I believe you can also dip fruits in rum, cognac or liqueur to make it taste even better (I didn't try this). 

Makes ~40 bite size truffles

1.   In a heavy saucepan on low heat mix the chocolate with heavy cream until the chocolate is melted. Let cool to room temperature.

2.   Mix in the coffee, alcohol and icing sugar. Mix until smooth. (Now if you want to add nuts as I did, take half of the mixture and mix in the nuts.) Cover and refrigerate until firm.

3.  Form the balls and place a small piece of chopped dried fruit in the centre. Roll each truffle in cocoa to cover all sides (if you are using nuts, roll each nutty truffle in chopped nuts).

I couldn't take any more pictures because I made them in the evening and the next morning they were already in the box. Fortunatelly I got a chance to open it and make a couple shots before my friend took them. I hope you enjoy it!


Related Posts Plugin for WordPress, Blogger...